I received a Blichmann Beer Gun for Christmas this year, and I finally had a chance to hook it up and use it. This was the first time that I have bottled beer from a keg and it was so easy. The Beer Gun allows you to shoot CO2 into the bottle to get rid of the air that would oxidize the beer. Once the bottle is full of CO2 you just pull the trigger and it will start filling from the bottom of the bottle. So quick and painless. While I had help with capping the bottles, I could see how the Beer Gun makes bottling easy for one person on their own. The Beer Gun is also easy to disassemble for thorough cleaning. I can take it apart and put it back together in a minute or two.
What finally got me off my butt and putting the Beer Gun to use was the National Homebrew Competition. I am entering My P-Dub Vanilla Stout and Guinea Pig IPA. I am not expecting to win anything, but I am looking forward to getting feedback.
Sunday, March 25, 2012

Wednesday, March 7, 2012
How To: Brew an Extract Batch
So you've decided you want to homebrew. You've got your equipment and ingredients and you are ready to go. But where do you go from there? I wanted to put together a how to with pictures to help you out. The recipe I am brewing for this example is Programmer's Elbow. The recipe can be found in Brewing Classic Styles by Jamil Zainasheff and John Palmer. This is an excellent book for extract recipes. It has an award winning recipe for every style so no matter what beer you want to make you can find it in this book.
Grab a beer and take a seat. There are a lot of pictures and wisdom after the break!
Monday, March 5, 2012
Why Brew?
People sometimes ask me why I brew my own beer. Why don’t I just buy it from the store? To me the answer is pretty simple. Brewing is fun. I like handing someone a beer and being able to say, “Yeah. I made that.” For me brewing is also a stress reliever. When I am brewing, it doesn’t matter what happened at work this week or anything else that is going on. I can just focus on the sweet smells coming from the kettle.
There are plenty of other reasons that people homebrew. Maybe they can’t get good beer near them. Maybe they discovered their new favorite beer while travelling and want to be able to drink it at home. Some brew to have beer cheaper than they can buy it for. Others brew for the pride of making something better than they can buy at the store.
There is some aspect of brewing that will appeal to just about anyone. Here are a few examples:
Artists – brewing provides a creative outlet to make a delicious beverage to share with friends and family. You can use endless combinations of ingredients to bring together wonderful flavors and aromas.
Scientists – brewing involves thermodynamics, chemistry, and biology. You can scratch the surface or dive deep into the processes and reactions that brewing entails.
DIYers – building homebrew equipment is a large component of the hobby for many homebrewers. There are projects large and small that can make brewing easier or just plain cooler.
Why do you brew?
Sunday, March 4, 2012
Finally... Progress!
After my setbacks with the hole saws, I was finally able to make some progress. I had a terrible time getting the hole saws to work, so once I was able to do that I felt like I was on top of the world. The holes for the receptacles are now cut.

Once I had all of the holes cut, another issue popped up. The two inch holes that I cut were not the right size. Thankfully they were too small rather than too large. The receptacles for the heating elements have a very slight taper to them that makes them 2-1/4" at the flange. Had I noticed this I could have just cut the 2-1/4" hole from the start and skipped the 2" hole saw altogether. Now I had to file/grind an eighth of an inch off of the four holes in the middle of the picture above. It was time consuming, but I am glad it is over now. I also cut the first holes for the heating element enclosures, but I did not take any pictures yet. I'll have some up when I make more progress on that front.

I did a test fit for all of the holes that have been punched or cut in the panel. Above are the receptacles and below is the front panel. I am very happy that everything fit as expected.
 I still have some work to do before I can paint. I need to get the holes drilled for screws for the receptacles and the front name plate. I also need to cut the hole where the SSRs will attach to the heat sink on the top of the panel.I am getting close and hoping that once I can get everything painted that I will have some smooth sailing for once.
For more information on the plans I am following please visit The Electric Brewery. There are wonderful write ups detailing every step of the way.
Monday, February 27, 2012
The Brew Gods Giveth, The Brew Gods Taketh Away
I have been stuck with my control panel build because I was waiting for the last tools to arrive that I needed. Nothing was supposed to arrive until Tuesday at the earliest. Imagine my surprise when I came home to find the mandrel for my hole saws had come two days early. I was so excited that the first chance I got I went down to drill the holes. I was hopeful that I would even be able to put the first coat of primer on the panel before going to bed.
I put the first hole saw on the mandrel, applied some cutting oil and I was ready to cut the holes for the pump receptacles. I started to drill the hole when disaster struck. The drill bit suddenly grabbed the control panel and sheared itself in half!

I called Amazon and they are sending a new part right away. Hopefully I won't have the same issue again. I am just thankful that the bit stayed in the control panel and didn't fly off somewhere.
Sunday, February 26, 2012
Front Panel Cut
Progress on the brew system build has gone slower than anticipated. Due to a lack of tools and time I haven't been able to get as much done as I wanted. However, I now have all of the necessary tooling in my possession or on order and it should arrive this week. I did manage to get the front panel cut out.
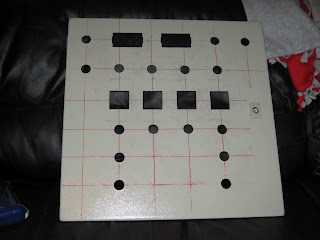

The round holes were made using a 22mm punch. The punch was very easy to use and it gives perfect circle cuts. For the square and rectangle holes I drilled a hole in opposite corners and then used a jigsaw to cut the shape. Then I filed down the edges to make the cut the right size for the components (PIDs, timer, and volt/amp meters). The volt and amp meters also require a notch in the side for it to clip into. I just used the file to make the notch.

In order to punch one of the holes I needed to remove the grounding post. I used a rotary tool to cut the post off then grind it down flat with the rest of the panel. I will now be grounding through a screw that will be holding a faceplate on the front panel.
Hopefully the updates will start coming at a faster pace. For more information on the plans I am following please visit The Electric Brewery. There are wonderful write ups detailing every step of the way.
Sunday, February 12, 2012
So It Begins
This weekend I was able to officially start working on my brew stand. I am starting with the control panel build because I have all the parts and it takes the most time to complete. The control panel will be housed in a 20"x20"x8" box. The box is designed with a removable plate on the bottom of the box for cable hookups. However, the plate is not big enough for all of the cables that I will be attaching in the box. I will be sealing the plate to the box permanently with JB Weld and flipping the box to make the sealed plate be on the top of the box. Thursday night I sealed the plate with the help of my zombie dog.

I let the JB Weld cure for a couple days. On Saturday night I used my rotary tool to cut the ends off of the screws and grind them down to be flush with the box. Spraying sparks all over the garage is always fun. It looks rough now, but once it is primed and painted it will look a lot better.


Using a great layout from one of the users on the Electric Brewery forums, I then was able to start measuring and marking the locations for all of the cuts I will need to make. All of the circles on the picture below encompass the center point of the hole that needs to be punched. These holes will be for the various lights and switches that will be on the control panel. The two rectangles at the top of the panel are for the volt and amp meters. The four squares in the middle of the panel are for the PID controllers and a timer. The PID controllers will manage the temperature in the kettles by controlling the heating elements.
On what is now the bottom of the panel I marked the locations for the receptacles. You can see the two scribbled out marks where I caught a mistake thanks to the old "measure twice, cut once" adage. The circle on the left is for the main power feed coming into the box. The four staggered marks just to the right of that are for the heating elements. The two marks in the upper right are for the two pumps, and the three marks in the bottom right are for the temperature probes.
I will have more updates coming soon as I make my first cuts of the project. For more information on the plans I am following please visit The Electric Brewery. There are wonderful write ups detailing every step of the way.
Subscribe to:
Posts (Atom)