I should have used a blow off tube. When I checked on my brews from the weekend tonight I was greeted by this mess. The american ale yeast in my Janet's Brown Ale was really going to town. Thankfully, it only came through the airlock and didn't get plugged and shoot to the ceiling. You can see it was still bubbling away. I swapped it out with another air lock and should be good for now. My fermentation closet smelled great. This beer is always good.
Showing posts with label gear. Show all posts
Wednesday, November 28, 2012
Yeast Victory
I should have used a blow off tube. When I checked on my brews from the weekend tonight I was greeted by this mess. The american ale yeast in my Janet's Brown Ale was really going to town. Thankfully, it only came through the airlock and didn't get plugged and shoot to the ceiling. You can see it was still bubbling away. I swapped it out with another air lock and should be good for now. My fermentation closet smelled great. This beer is always good.
Sunday, September 23, 2012
It's Alive!
After somewhat of a hiatus from working on my brewing system (thank you overtime), I have finally made progress! The outlets I need are now installed in the garage so I was able to test the control panel. It was very satisfying to finally see the lights come on. When I first turned the key, the amp meter didn't work. I had a moment of panic as I remembered all of the build threads that I read that had a blown or defective amp meter. I shut it off and took it back in the house to inspect the wiring. The problem was staring me right in the face. One of the power wires for the amp meter had come loose. I reconnected it and powered back up and the amp meter was working perfectly.
So revisiting the list of what I needed to finish:
I ran through some tests on the control panel and everything checked out as working except the boil temperature probe and the pumps. The pumps just have not been tested because I still need to get them wired properly. The boil temperature probe was another easy fix because I just had a bad solder job. That means that I successfully wired the panel with everything going to the right place. I am very proud of that.
With my new found momentum I also made all of the hoses that I need and finished the MLT. The hoses were very simple to put together. I don't know why I waited so long to make them. It was just a matter of clamping quick disconnects to the ends. The last step for the MLT was to attach the hose in that will return the wort to the mash tun during recirculation. This also only required clamping a hose in place.
I also started to work on the control panel mount, but quickly learned that I did not receive the correct mount. I need to send it back tomorrow and order the right one.
Have the outlet installed- Finish brew stand (wood shelves, control panel mount)
- Pump cord rewire
Wire heating elementsRecirculating coil installCounter-flow chiller assemblyMake hoses with quick disconnects- Ventilation hood
I'm feeling really good about finishing this up in the next week or two. It may come down to just being able to get the right parts in time.
Saturday, July 21, 2012
Kettles Complete!
It took a lot longer than it should have, but I finally finished my new brew kettles! Summer finally arrived in a big way and that really slowed me down. I suddenly wanted to be outside all of the time. During this time, I also broke my brew ban. When my friend was visiting for the National Homebrewers Conference we just had to brew up a batch! I'll have a post up on the rye pale ale we brewed soon.
But enough about why I haven't made progress as quickly, let just look at the shiny things! First step was installing the HERMS coil in the HLT. That was a much easier process than I was expecting. I think that is largely due to picking up a tube cutter that was able to cut stainless steel. I was able to quickly trim the ends of the coils needed rather than struggling with a hacksaw.
The last step was wiring the heating elements in the HLT and the boil kettle. Once I figured out an easy way to strip the rubber coating off of the 10/3 wire, this was a pretty easy job. The only issue I had was that I had misplaced the grounding screws for the gang boxes. So I had to go pick up a couple new ones.
So revisiting the list of what I needed to finish:
But enough about why I haven't made progress as quickly, let just look at the shiny things! First step was installing the HERMS coil in the HLT. That was a much easier process than I was expecting. I think that is largely due to picking up a tube cutter that was able to cut stainless steel. I was able to quickly trim the ends of the coils needed rather than struggling with a hacksaw.
The last step was wiring the heating elements in the HLT and the boil kettle. Once I figured out an easy way to strip the rubber coating off of the 10/3 wire, this was a pretty easy job. The only issue I had was that I had misplaced the grounding screws for the gang boxes. So I had to go pick up a couple new ones.
So revisiting the list of what I needed to finish:
- Have the outlet installed
- Finish brew stand (wood shelves, control panel mount)
- Pump cord rewire
Wire heating elementsRecirculating coil install- Counter-flow chiller assembly
- Make hoses with quick disconnects
- Ventilation hood
Monday, July 2, 2012
What a Month
After my last post, I had a whirlwind end of the month. We had some wonderful visits from friends and I attended the National Homebrewers Conference (more on that in a future post). The first friend that came by helped out with some of the build, but after that everything was put away until tonight. I have still made a lot of progress so prepare yourself for a number of updates!
For starters, I finished the control panel! After receiving the terminals I needed, I was able to wire up the SSRs that will send power to the heating elements. The only drawback to finishing the panel is that I am not able to test it yet. I don't have the outlet installed that will power the brewery so I will have to wait to do any potential trouble shooting.
I finished the temperature probes for the kettles as well. The last two probes were assembled with greater ease than the first one. I guess I learned whatever lessons were necessary while making the first one to make the last two smooth sailing.
I mentioned in my last post that I was starting to drill holes in my shiny new kettles. Once I got past the shock of putting holes in my kettles and got some new carbide bits, it was surprisingly easy. The punches that I used for making clean holes in the kettles are just wonderful. After I had all of the pilot holes drilled I realized I had neglected to purchase the 13/16" punch I needed to install all of the ball valves on the kettles. Thankfully I was able to get one in pretty quickly and finish the job.
My friend helped me install all of the ball valves and the heating elements on the kettles. Above is a picture of the HLT with the heating element and the ball valves for the recirculating coil installed. I haven't wired the heating elements yet. I am saving that for last on the kettles because it is easier to move them around now without a 6 ft cord hanging off of them. I was glad my friend was there to help because it made things go a lot faster and smoother.
Above is a picture of the inside of the boil kettle. The heating element, temp probe and Hop Stopper are all installed. The temp probe still has the protective covering on it which is why it appears so large and white.
My friend also helped me assemble the brew stand. This is another job that was much easier with two people. For the brew stand I am taking some inspiration from the Electric Brewery forums and using an industrial shelving unit I bought at a big box hardware store. Below is a picture of the kettles aligned on the stand (boil kettle, mash tun, HLT respectively).
Tonight I was able to get back to building and I managed to get all of the fittings installed on my Chugger pumps. After playing with the amount of tephlon tape to use for various fittings I was able to get everything aligned as I wanted. I also managed to tear my right hand up by not paying attention to where I was grabbing the threaded elbows. I have a number of little cuts on the palm of my hand.
The list of things to do is quickly diminishing and I am getting excited to finally brew on the system. Here is what I have left to do:
The only thing that is out of my control is having the outlet installed. I am at the whim of the electrician's schedule. If all goes to plan I should be brewing by the end of July!
For starters, I finished the control panel! After receiving the terminals I needed, I was able to wire up the SSRs that will send power to the heating elements. The only drawback to finishing the panel is that I am not able to test it yet. I don't have the outlet installed that will power the brewery so I will have to wait to do any potential trouble shooting.
I finished the temperature probes for the kettles as well. The last two probes were assembled with greater ease than the first one. I guess I learned whatever lessons were necessary while making the first one to make the last two smooth sailing.
I mentioned in my last post that I was starting to drill holes in my shiny new kettles. Once I got past the shock of putting holes in my kettles and got some new carbide bits, it was surprisingly easy. The punches that I used for making clean holes in the kettles are just wonderful. After I had all of the pilot holes drilled I realized I had neglected to purchase the 13/16" punch I needed to install all of the ball valves on the kettles. Thankfully I was able to get one in pretty quickly and finish the job.
My friend helped me install all of the ball valves and the heating elements on the kettles. Above is a picture of the HLT with the heating element and the ball valves for the recirculating coil installed. I haven't wired the heating elements yet. I am saving that for last on the kettles because it is easier to move them around now without a 6 ft cord hanging off of them. I was glad my friend was there to help because it made things go a lot faster and smoother.
Above is a picture of the inside of the boil kettle. The heating element, temp probe and Hop Stopper are all installed. The temp probe still has the protective covering on it which is why it appears so large and white.
My friend also helped me assemble the brew stand. This is another job that was much easier with two people. For the brew stand I am taking some inspiration from the Electric Brewery forums and using an industrial shelving unit I bought at a big box hardware store. Below is a picture of the kettles aligned on the stand (boil kettle, mash tun, HLT respectively).
Tonight I was able to get back to building and I managed to get all of the fittings installed on my Chugger pumps. After playing with the amount of tephlon tape to use for various fittings I was able to get everything aligned as I wanted. I also managed to tear my right hand up by not paying attention to where I was grabbing the threaded elbows. I have a number of little cuts on the palm of my hand.
The list of things to do is quickly diminishing and I am getting excited to finally brew on the system. Here is what I have left to do:
- Have the outlet installed
- Finish brew stand (wood shelves, control panel mount)
- Pump cord rewire
- Wire heating elements
- Recirculating coil install
- Counter-flow chiller assembly
- Make hoses with quick disconnects
- Ventilation hood
The only thing that is out of my control is having the outlet installed. I am at the whim of the electrician's schedule. If all goes to plan I should be brewing by the end of July!
Wednesday, June 13, 2012
Letdown but Progress
Tonight was a time of great nervousness and anticipation. I was finally going to drill a hole in one of my shiny kettles. Instead, all I managed to do was dig halfway through the kettle wall because my drill battery died. So I get to continue to be worried that I will somehow mess it up until tomorrow. I did get all of the holes marked that need to be drilled. There are 5 total and each one is going to take awhile. The kettle does not like to be drilled and the going is very slow.
Tuesday, June 12, 2012
Control Panel and the Elements
After a week of work I am almost done wiring the control panel. I have 4 wires left to run, but I am waiting for some ring terminals to arrive in the mail so I can finish. I tried to keep the wires somewhat orderly, but I'm sure some electrical pros would say this is a rats nest.
I also got some work done on the heating element enclosures. The front plates have been attached to the gang boxes with JB Weld. They are drying as I type this. The next step in the process for these is probably the most daunting of the entire build. It isn't daunting because it is technically difficult, but because it requires drilling a hole in two of my brand new shiny kettles. No pressure.
For my brew stand I decided to just use some heavy duty shelving rather than build a stand out of wood or metal. The box is sitting in the garage waiting to be assembled. With the control panel almost finished and the other aspects of this build moving along, I can feel the end of the project coming. It is exciting and I am very eager to power it up and brew for the first time.
Wednesday, May 30, 2012
Heatsinks and Enclosures
Unfortunately I don't have any pictures for tonight, but I'll have some this weekend of the progress I am making. I mentioned in the last post that I wanted to have my control panel done by the end of the weekend. That didn't happen. I ran into an issue with the heatsink and my taps. I couldn't get deep enough holes tapped for the screws that will hold the SSRs against the heatsink. Because of this I have the bottom of 2 screws embedded in my heatsink and I had to order a bottoming tap. The tap came today and I had time to test fit one of the SSRs. It worked beautifully. Tomorrow I should be able to get the other SSR fitted and then mount the heatsink. That is all I have left to do before I start wiring.
Since I couldn't work on my control panel, I started working on the heating element enclosures. These boxes will provide a dry place for the heating element wiring while the element is working hard boiling my wort. The boxes are 2 gang electrical boxes meant for outdoor electrical connections. A flat plate is used to provide an even surface for mounting against the kettle.
The flat panel is designed to be used on only one side of the gang box. However, in this application we need the flat plate on both sides. To do this I had to drill holes in the box to align with those already in the plate. That part was easy. What wasn't easy was trying to get the flat plate to sit flush against the outside of the box. After looking for solutions on forums, I tried to countersink the holes. After a lot of trial and error I ended up with some decent looking countersinks, but the flat plate still didn't fit right.
I stared at the two parts and tried pushing them together for a long time before noticing that the box was too big for the flat plate. It was too wide to sit flush because the corners were pushing against the bevel on the plate edges. A quick measurement confirmed what my eyes were telling me. If only I had checked that first. I wouldn't have needed to spend so much time trying to get a good countersunk hole. Now I will just have to JB Weld the box and plate together and fill in any holes that may arise. Hopefully I can get it right the first time though.
After finding out I had wasted a lot of time I finally moved on to painting the boxes. They are a dull grey normally, but I painted them with silver spray paint with a hammered finish. This way they will be a closer match to the kettles that they will be attached to.
Overall, the weekend wasn't a complete bust, but I didn't get as much done as I was hoping. The remainder of my parts also arrived today so if I get stuck on any one part of the build I will be able to move on to another portion with ease. I still think my goal of mid June is doable, but now I need to really keep at it. I am getting excited to brew again!
Since I couldn't work on my control panel, I started working on the heating element enclosures. These boxes will provide a dry place for the heating element wiring while the element is working hard boiling my wort. The boxes are 2 gang electrical boxes meant for outdoor electrical connections. A flat plate is used to provide an even surface for mounting against the kettle.
The flat panel is designed to be used on only one side of the gang box. However, in this application we need the flat plate on both sides. To do this I had to drill holes in the box to align with those already in the plate. That part was easy. What wasn't easy was trying to get the flat plate to sit flush against the outside of the box. After looking for solutions on forums, I tried to countersink the holes. After a lot of trial and error I ended up with some decent looking countersinks, but the flat plate still didn't fit right.
I stared at the two parts and tried pushing them together for a long time before noticing that the box was too big for the flat plate. It was too wide to sit flush because the corners were pushing against the bevel on the plate edges. A quick measurement confirmed what my eyes were telling me. If only I had checked that first. I wouldn't have needed to spend so much time trying to get a good countersunk hole. Now I will just have to JB Weld the box and plate together and fill in any holes that may arise. Hopefully I can get it right the first time though.
After finding out I had wasted a lot of time I finally moved on to painting the boxes. They are a dull grey normally, but I painted them with silver spray paint with a hammered finish. This way they will be a closer match to the kettles that they will be attached to.
Overall, the weekend wasn't a complete bust, but I didn't get as much done as I was hoping. The remainder of my parts also arrived today so if I get stuck on any one part of the build I will be able to move on to another portion with ease. I still think my goal of mid June is doable, but now I need to really keep at it. I am getting excited to brew again!
Wednesday, May 23, 2012
Tap That!
I spent the last couple days marking and measuring where I needed all of the holes for the internal components for the control panel. Tonight I decided that I had everything marked correctly and it was time to start drilling. I started with the heatsink. The holes for the heatsink were the easier than I was anticipating and were exactly where I needed them. Next I moved on to the backplate for the internal components.
I got half of the back panel drilled. I also tapped the holes. By tapping the holes, I won't have to remove the entire backplate to replace a component if it fails. Hopefully that situation doesn't arrive, but I am ready if it does. This whole process has been going smoother and faster than I was expecting. So far I haven't messed up for any of the components. It is definitely putting me ahead of the pace to finish my control panel by the end of the weekend.
I also ordered the last parts that I need to do all of the kettle conversions. So once I finish the control panel I should have the stuff I need to keep moving. I am getting excited the closer I get to finishing the control panel because the rest of the build should be easier and a lot less stressful.
Saturday, May 19, 2012
Control Panel Install
I have finally made forward progress on my electric brewery build! Work and life have just been crazy for awhile so I was moving along like a glacier on this project. Since my last sporadic updates, I have painted the control panel box, installed the components in the door, put the door tags on, installed the handles and laid out the internal components.
My next move will be drilling the backplate so I can mount the internal components. Then I will install the power receptacles and start wiring the control panel. I am hoping to have this system done within a month. There is a lot to do in order to accomplish that goal, so I am going to stop writing and get back to it!
Wednesday, May 2, 2012
Brewing Randomness
Life has pretty much sucked brewing-wise over the last month. Work has been crazy and just sucked up a ton of my time. So over the last month I have been able to randomly get stuff done when time and energy allowed. To kick things off, I managed to keg all 3 beers that were waiting in the fermenters. This included my ESB, red ale, and the barleywine that has been aging on bourbon soaked oak chips. The ESB and red ale both taste as they should. The barleywine smells amazing, but still lacks in the taste department. I am going to bottle it up (with my awesome new BeerGun) and see how it ages. I also worked on a new beer marking system, but that will be a post for another day.
I also got work done on my brewery control panel. I am in the process of cleaning up the box and door so I can paint them! Then it will be on to the fun part of wiring everything. That will be a pain, but if I take my time I should do alright. The painting will take a week or so to let everything dry properly, but then I will be back up and running at full speed.
At the National Homebrew Conference in June, I will be taking the Beer Judge Certification Program exam to become an official homebrew judge. The test will be difficult, but hopefully I can do well enough to pass. I started watching some online recordings and following along with the tastings to help develop my palate. I will have more on this later.
I also brewed my last beer ever. Well at least my last beer on my current set up. I have decided to focus what is normally my brew time on the brew system to try to make that operational before some friends visit in June so we can brew together on it. My last beer was a Rogue Dead Guy Ale "clone" that I am calling Not Dead Guy Ale for a friend coming back from deployment. The name also works on the level that I was forced to sub out some of the grain due to local availability. The brew day went well. This was the first time I have ever done a 90 minute boil, but thanks to Beersmith I mashed and boiled with the correct volumes of water to end up with my 5 gallons. This beer is currently bubbling away in the fermenter.
I feel bad after not posting for the entire month of April, but life just got in the way. It especially hurts after starting the year so well with regards to posting about my brewing. Looking ahead, my work schedule seems to be calming down so I will hopefully have more time to play with brewing stuff and post about it.
I also got work done on my brewery control panel. I am in the process of cleaning up the box and door so I can paint them! Then it will be on to the fun part of wiring everything. That will be a pain, but if I take my time I should do alright. The painting will take a week or so to let everything dry properly, but then I will be back up and running at full speed.
At the National Homebrew Conference in June, I will be taking the Beer Judge Certification Program exam to become an official homebrew judge. The test will be difficult, but hopefully I can do well enough to pass. I started watching some online recordings and following along with the tastings to help develop my palate. I will have more on this later.
I also brewed my last beer ever. Well at least my last beer on my current set up. I have decided to focus what is normally my brew time on the brew system to try to make that operational before some friends visit in June so we can brew together on it. My last beer was a Rogue Dead Guy Ale "clone" that I am calling Not Dead Guy Ale for a friend coming back from deployment. The name also works on the level that I was forced to sub out some of the grain due to local availability. The brew day went well. This was the first time I have ever done a 90 minute boil, but thanks to Beersmith I mashed and boiled with the correct volumes of water to end up with my 5 gallons. This beer is currently bubbling away in the fermenter.
I feel bad after not posting for the entire month of April, but life just got in the way. It especially hurts after starting the year so well with regards to posting about my brewing. Looking ahead, my work schedule seems to be calming down so I will hopefully have more time to play with brewing stuff and post about it.
Sunday, March 25, 2012
Beer Gun!
I received a Blichmann Beer Gun for Christmas this year, and I finally had a chance to hook it up and use it. This was the first time that I have bottled beer from a keg and it was so easy. The Beer Gun allows you to shoot CO2 into the bottle to get rid of the air that would oxidize the beer. Once the bottle is full of CO2 you just pull the trigger and it will start filling from the bottom of the bottle. So quick and painless. While I had help with capping the bottles, I could see how the Beer Gun makes bottling easy for one person on their own. The Beer Gun is also easy to disassemble for thorough cleaning. I can take it apart and put it back together in a minute or two.
What finally got me off my butt and putting the Beer Gun to use was the National Homebrew Competition. I am entering My P-Dub Vanilla Stout and Guinea Pig IPA. I am not expecting to win anything, but I am looking forward to getting feedback.
Sunday, March 4, 2012
Finally... Progress!
After my setbacks with the hole saws, I was finally able to make some progress. I had a terrible time getting the hole saws to work, so once I was able to do that I felt like I was on top of the world. The holes for the receptacles are now cut.
Once I had all of the holes cut, another issue popped up. The two inch holes that I cut were not the right size. Thankfully they were too small rather than too large. The receptacles for the heating elements have a very slight taper to them that makes them 2-1/4" at the flange. Had I noticed this I could have just cut the 2-1/4" hole from the start and skipped the 2" hole saw altogether. Now I had to file/grind an eighth of an inch off of the four holes in the middle of the picture above. It was time consuming, but I am glad it is over now. I also cut the first holes for the heating element enclosures, but I did not take any pictures yet. I'll have some up when I make more progress on that front.
I did a test fit for all of the holes that have been punched or cut in the panel. Above are the receptacles and below is the front panel. I am very happy that everything fit as expected.
For more information on the plans I am following please visit The Electric Brewery. There are wonderful write ups detailing every step of the way.
Sunday, February 26, 2012
Front Panel Cut
Progress on the brew system build has gone slower than anticipated. Due to a lack of tools and time I haven't been able to get as much done as I wanted. However, I now have all of the necessary tooling in my possession or on order and it should arrive this week. I did manage to get the front panel cut out.


The round holes were made using a 22mm punch. The punch was very easy to use and it gives perfect circle cuts. For the square and rectangle holes I drilled a hole in opposite corners and then used a jigsaw to cut the shape. Then I filed down the edges to make the cut the right size for the components (PIDs, timer, and volt/amp meters). The volt and amp meters also require a notch in the side for it to clip into. I just used the file to make the notch.
In order to punch one of the holes I needed to remove the grounding post. I used a rotary tool to cut the post off then grind it down flat with the rest of the panel. I will now be grounding through a screw that will be holding a faceplate on the front panel.
Hopefully the updates will start coming at a faster pace. For more information on the plans I am following please visit The Electric Brewery. There are wonderful write ups detailing every step of the way.
Sunday, February 12, 2012
So It Begins
This weekend I was able to officially start working on my brew stand. I am starting with the control panel build because I have all the parts and it takes the most time to complete. The control panel will be housed in a 20"x20"x8" box. The box is designed with a removable plate on the bottom of the box for cable hookups. However, the plate is not big enough for all of the cables that I will be attaching in the box. I will be sealing the plate to the box permanently with JB Weld and flipping the box to make the sealed plate be on the top of the box. Thursday night I sealed the plate with the help of my zombie dog.

I let the JB Weld cure for a couple days. On Saturday night I used my rotary tool to cut the ends off of the screws and grind them down to be flush with the box. Spraying sparks all over the garage is always fun. It looks rough now, but once it is primed and painted it will look a lot better.


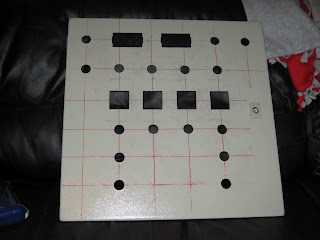
Using a great layout from one of the users on the Electric Brewery forums, I then was able to start measuring and marking the locations for all of the cuts I will need to make. All of the circles on the picture below encompass the center point of the hole that needs to be punched. These holes will be for the various lights and switches that will be on the control panel. The two rectangles at the top of the panel are for the volt and amp meters. The four squares in the middle of the panel are for the PID controllers and a timer. The PID controllers will manage the temperature in the kettles by controlling the heating elements.
On what is now the bottom of the panel I marked the locations for the receptacles. You can see the two scribbled out marks where I caught a mistake thanks to the old "measure twice, cut once" adage. The circle on the left is for the main power feed coming into the box. The four staggered marks just to the right of that are for the heating elements. The two marks in the upper right are for the two pumps, and the three marks in the bottom right are for the temperature probes.
I will have more updates coming soon as I make my first cuts of the project. For more information on the plans I am following please visit The Electric Brewery. There are wonderful write ups detailing every step of the way.
Monday, February 6, 2012
UPS Guy Was Good To Me
Three boxes were bright to the door today and they were filled with all kinds of toys. I now have all the parts to build the control panel for the brewery, my temperature probes and the heating element enclosures. Also included were the stainless steel HERMS coil and the counterflow wort chiller. I am now just waiting on some tooling so that I can start the build. I am very excited for the build to start.
Monday, January 30, 2012
Brewery Upkeep
Over the past couple months I have recommitted myself to brewing. Part of that is doing more of the little things between brew days to ensure that I am getting the most out of the beer that I am working so hard (...right...) to make. Some of the things I need to keep on top of are:
- Equipment Cleaning - having the mash tun, pots and other associated equipment clean before the next brew day
- Manage Fermenters - checking the temperature of the closet, keeping enough sanitizer in the air lock, etc.
- Keg/Keezer Maintenance - cleaning kegs, cleaning beer line, keeping inside of keezer ice and mold free
There are probably more things that I should be doing, but already I am seeing an improvement in not only my product, but the brew day as well. Tonight I spent time cleaning kegs to have them ready for the beers that are currently fermenting. I also cleaned 2 lines that were about to be hooked up to kegs. If I am going to be serious about making good beer, these are the kinds of things I need to keep in mind between brew days. I'm not on a break because I got the beer in the fermenter.
Tuesday, January 24, 2012
Change Is Coming
And for once change is a good thing. I mentioned in a recent post that I was going to have some new gear coming into the fold. I will be building a new brew system. The system design comes from the wonderful work of Kal over at The Electric Brewery. I am following Kal's design almost exactly. My system will be designed to handle 50 amps instead of the 30 amps that Kal's initial design details.

You may have noticed my price per pint skyrocketing over the last couple weeks. That is because I started ordering parts for the system. The first parts arrived today. They are easily the second coolest part of the system. I present my new 20 gallon Blichmann Boilermakers! The decision to get the Blichmann kettles was difficult. I could get other kettles cheaper, but I decided to just build exactly what I wanted in the brew system.
I will be documenting my system build here on the blog. I am still waiting for some tooling and additional parts before I can really get started so updates on the system will be slow at first. While I wait I will just be staring at how shiny and cool my new kettles are.
Thursday, January 5, 2012
New Toys
I've had a couple new brewery toys to play with for the last couple months. The first is a grain mill. I was having an issue getting a consistent grain crush from the various places I was shopping at to purchase my ingredients. After doing some research I decided to go with the Barley Crusher. It seemed to provide the most bang for my buck. With the addition of a 5 gallon bucket, the grain mill was ready to go. It offers the ability to crush the grain with a drill, but so far I have just been crushing it by hand. Turning the crank before brew day is a nice workout and gives me something to do while my strike water is heating.
The newest toy is a refractometer. I have only had this for one and a half batches so far and already I love it. Taking pre-fermentation gravity readings is now so fast and easy that I can't help but do them. It also helps me track my progress pre and post boil. I know whether or not I need to add some extract to help meet my target original gravity. I have also been taking readings post fermentation along with my hydrometer in order to test some of the refractometer correction equations that could allow me to take readings post fermentation.
Stay tuned for some big changes coming. I am about to have an onslaught of new toys!
Wednesday, May 4, 2011
Keezer Improvements
It's been awhile since I have posted. That's because I haven't done much brewing. I need to hurry up and do that because I have nothing in the pipeline now. I just stopped in to mention a couple updates I've made to the Keezer.
First up is the new tap handles. My wife gave me these for Christmas. The wooden handles are branded with "Cedar Rose Brewing" across them. Definitely gives the keezer some great character (especially compared to the standard plastic handles). So far I have just had simple print outs to say what beers are on tap, but as I have more time

The other addition to the keezer was a drip tray. I made wooden supports for the drip tray that are attached to the keezer by magnets. The drip tray is then attached to the supports using velcro. I used rare earth magnets for the supports. I have had at least a couple full beers sitting on the drip tray without it moving at all. It is very sturdy.

Stay tuned to the blog. There are a few new gear posts coming. Then back to brewing!
First up is the new tap handles. My wife gave me these for Christmas. The wooden handles are branded with "Cedar Rose Brewing" across them. Definitely gives the keezer some great character (especially compared to the standard plastic handles). So far I have just had simple print outs to say what beers are on tap, but as I have more time
The other addition to the keezer was a drip tray. I made wooden supports for the drip tray that are attached to the keezer by magnets. The drip tray is then attached to the supports using velcro. I used rare earth magnets for the supports. I have had at least a couple full beers sitting on the drip tray without it moving at all. It is very sturdy.
Stay tuned to the blog. There are a few new gear posts coming. Then back to brewing!
Saturday, December 4, 2010
IPA Recipe Creation
I've started to create my own IPA recipe. I am doing this to create a good beer on my own and to learn more about what flavors the different ingredients impart in the beer. However, I got off to a bad start with this beer by accidentally getting crystal 60 instead of crystal 40. So my IPA is a little darker than it should be, but I don't know enough to understand how that will change the flavor.
The brew was very smooth and I didn't have any issues except with a new hop bag I was trying out. The bag is over a foot long and maybe 2-3 inches wide. It is made of very fine mesh and I thought it would work well for the pellet hops I use. However the bag is not wide enough. The hops just soaked up water and were stuck in the end of the bag. I ended up only putting my bittering hops in the bag and the rest went straight in the boil kettle. I am a little worried that I did not get full utilization of the hops, but I won't know for sure until I drink the finished beer. The gravity sample had a nice bittering to it though so I could be alright.
The first version of my recipe is below. I will be tweaking it as I go forward to try to make a better beer. My LHBS did not have an alpha acid percentage for the Amarillo hops.
8 lb Gold LME
1 lb Crystal 40 60
1 oz Columbus (14.4%) - 60 min
1 oz Amarillo - 45 min
0.5 oz Amarillo - 20 min
0.5 oz Amarillo - 5 min
Wyeast 1056 American Ale
Subscribe to:
Posts (Atom)